
The Amazon Affiliate Program is the BIGGEST affiliate program in the world since it gives you the ability to promote the gigantic database of Amazon products…
…And get commissions on not just the products you promote – but also on all purchases, your referred visitor makes in a 24-hour period.
This actionable and comprehensive beginner’s guide is all you’ll need to be able to promote Amazon products as an affiliate. Once you’re done reading this guide –
- You’ll be able to sign-up as an affiliate at Amazon.
- You’ll be able to determine which Amazon products people are looking for in a specific niche. These are the best sellers at Amazon.
- You’ll learn how to obtain the product’s affiliate link.
- You’ll be able to determine which keywords to use for your contents to increase the chances of your promotions visibility on search engines.
- Be able to create your own WordPress blog where you can build your community and house your banners and links.
- You should be able to create a post and learn the important tips when making one.
- You’ll be able to create an Amazon aStore.
- You’ll learn 2 of the best ways that people use when using the links and banners on their site.
- If that were pretty much what you’re hoping to do, then you’d better bookmark this page because that’s exactly what you’ll get.
Alright! Let’s start by walking you through the sign-up process at Amazon.
Amazon Affiliate Program Sign-Up
Go to https://affiliate-program.amazon.com/, click the “Join Now for Free” button on the upper-right part of the page. It will then take you to another page which will ask for your details.

Enter your email address, click the “I am a new customer” radio button and click the yellow “Sign in using our secure server” button.
You then need to fill out the registration form which will ask for your name and have you re-type your email address. You’ll also need to type in your password for Amazon twice and click the yellow “Create account” button.
After clicking the “Create account“ button, it will route you to the account information page. You need to type in all the information. It will ask for the Payee name, address, country, phone number, and a radio button which will ask “Who is the main contact for this account”.
After typing in all the info, click the yellow “Next: your Website Profile” button. Note that you’ll need to type in all the information that they’re requesting.
It will then take you to the “Your Website Profile” page. At this point, you still need to completely fill out all the information that they’re requesting. After which, you can then click the yellow “Next” button.
You will then be taken to the identity verification page where you’ll need to type in your phone number so Amazon can verify your identity.
Once you click the call me now button, you’ll receive a phone call from Amazon asking you to type in the 4 digit phone number on your computer’s screen. This 4 digit pin will only appear after you click the “call me now button”.
After you type in the 4 digit pin on your phone, you have then successfully verified your identity and the page on your screen will automatically route to the “Contract terms” page where you need to agree to their contract and click the yellow “Finish” button.
You’ll then be taken to the thank you page where you’ll see your associates ID. You need to take note of this ID.
On the thank you page, you can also specify your payment method. Just click the yellow “Specify Payment Method Now” and it will take you to another page where it will give you three options. Choose which one will work best for you and click continue.

That’s about it for the sign-up process. Once you’re done with the steps I mentioned above, you should be able to start choosing which product to promote.
The good part with Amazon is it pretty much does a lot of heavy lifting for you. Instead of doing EXTENSIVE research on which product is selling like crazy online, Amazon tells you the best selling products per category.
Finding Amazon’s Best Selling Products
Although you don’t necessarily have to go for the best selling products (since you can promote any products at Amazon), I strongly suggest that you choose the best selling products instead since it increases your chances of sales.
The fact that it’s tagged as “best selling” is an indication that a lot of people like it so it should be a lot easier to sell those than other products that’s pretty much invisible to your target market.
Promoting these products makes a lot more sense since it’s already proven and tested that a lot of people have already bought it. You’ll get better chances of sales on these products than going for the other products in Amazon.
Now that we’ve already determined which products to promote, let’s go into the nitty gritty of things and take a look at how EXACTLY do you get these products to show on your page for your promotion.
We’ll talk about obtaining your chosen product’s affiliate link and banner.
Additional Tips for Choosing an Amazon Product
- Besides choosing the best selling products, you need to look out for the best sellers that are comparatively more expensive than other products. Choosing products that are on the $100 margin should be a good product to start with.
- Do keyword research on your product. If no one’s looking for it, then don’t even bother promoting that product.
- Look for products that are time sensitive. A good example for this is NFL shirts, etc. When it’s Super Bowl time, then selling Super Bowl shirts might give you more chances of sales.
Considering these tips when picking which affiliate product to promote can do you wonders. Be sure to take note of these and implement them on your site. That way, you’ll have a higher chance of increasing your sales.
Getting Links and Banners From Associates Central
Head over to the “Product Linking > Product Links” page and SEARCH for the product you’d like to promote.
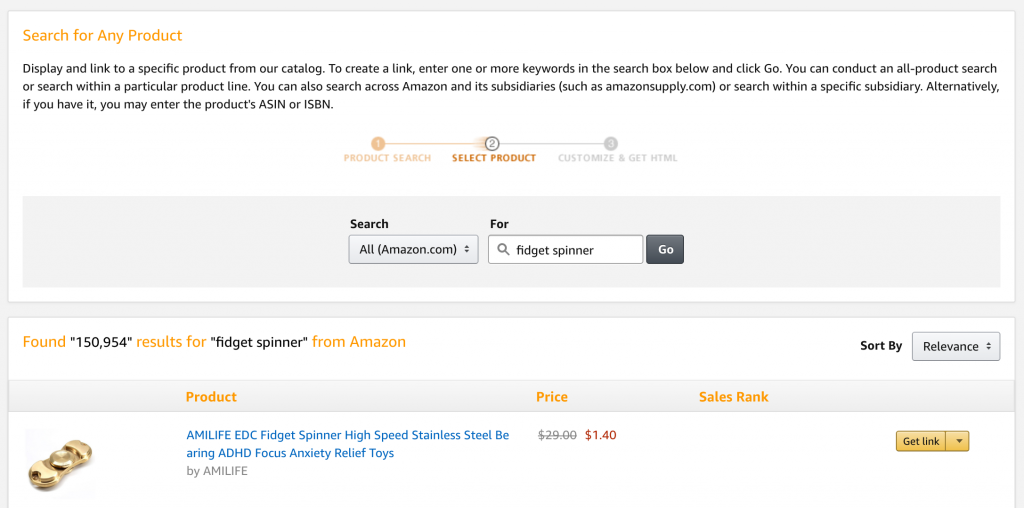
It will show you all products for your keyword. Simply hit “Get Link” button with the product you want to promote…
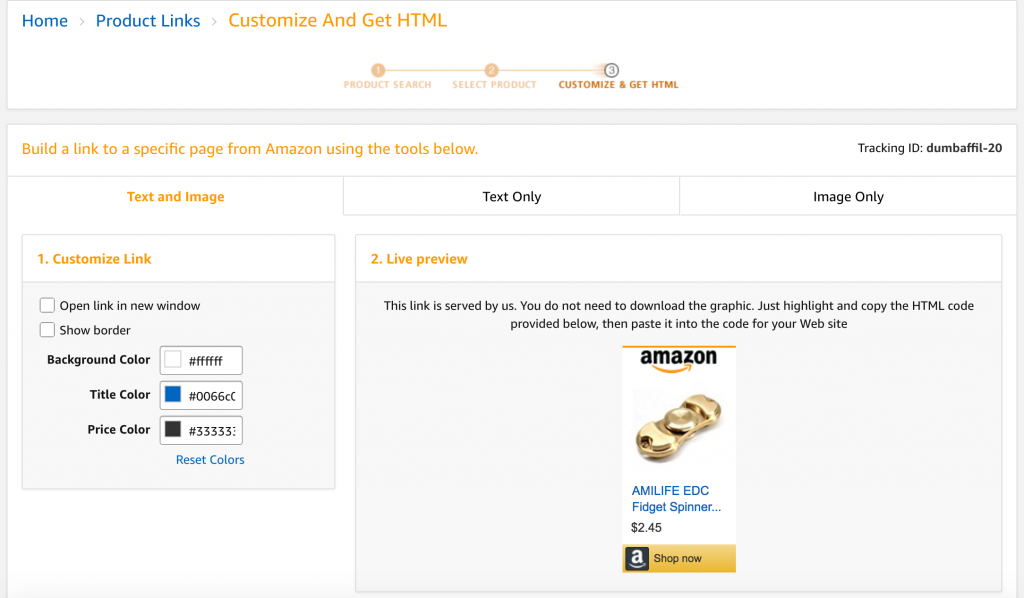
Then you just have to choose the type of material that you want when promoting. When I say material, I meant whether you want an “image with a text”, “text only”, “image only”, or “add to widget”. You just have to select the appropriate tab.
After selecting and customizing your banner/text, you simply have to copy the HTML code on the mid bottom part of the page. Or you can simply click the “Highlight HTML” button and copy.
Note that you can see the live preview of the material that you’ve chosen. That way, you can pretty much tell how it’s going to look like in your blog.
That’s about it.
The HTML code that you highlighted and copied is where your affiliate link is embedded. That’s what you need to copy and paste on your site so your visitors can click on it and buy from Amazon. If and when they click on it, Amazon will be able to determine that the purchase came from you since that link is specific to you only.
Now that we already have our marketing materials (links/banners), let’s talk about how you’ll obtain the keywords that people are typing in to find your product on search engines.
This is an important element in affiliate marketing since this will enable your content to show up on search engines when people type in a specific keyword.
How do you determine the keywords? Here’s what you need to do…
Head over to the Google Keyword Tool and search the product name that you chose.
You’ll then see the specific keywords that the people are typing in to find your product on search engines. I suggest that you select a keyword with greater than 1000 searches per month. This implies decent traffic to your site if you’re ranked in the search engines.
When creating content on your site, you need to use the keywords based on the keyword tool suggestions to increase the chances of your content/promotion from being seen when people look for the product on search engines.
That’s how the complete process of finding which keywords to incorporate into your content for your product. If you base your content on the keywords, you’ll get better results on your affiliate marketing offer.
At this point let’s have a quick recap of what we have…
- We already have an Amazon affiliate account.
- We already have the best selling product to promote.
- We already have the banner and affiliate links.
- Lastly, we already have the keywords that we’ll base our content on.
Since we pretty much have everything set-up, let’s talk about creating a WordPress site where you can house all of your links, banners, and start building a community around it.
Affiliate Guide: Creating a WordPress Website
After purchasing a domain name and hosting, you need to install WordPress on your domain. The famous 5-minute WordPress install would automate your installation process. Follow the link above to install WordPress in minutes.
Log-in to your blog by typing in http://yourblogsitename.com/wp-admin. In this case, my sample blogsite’s name is Abundancethatmatters that’s why I should type in, http://abundancethatmatters.com/wp-admin.

This will then take you to the login page and once you’re logged-in, you can now see your dashboard.
Installing a Theme
N ow that you’re on the dashboard, you need to click the “Appearance” tab on the lower left part of the page then click “Themes“.
It should then take you to a different page where it’s supposed to show where themes are housed. If you don’t see anything, I suggest that you click the “Install Themes” tab on the upper mid part of the page.
You will then see a page with all sorts of filters but I suggest that you click the “Find Themes” button on the lower left part of the page if you aren’t sure what kind of theme you like. That way you’ll see all the themes available.
For the purpose of this walkthrough, let’s say you picked the theme iFeature by Cyberchimps. You should see this theme if you scroll down and direct your attention on the left part of the page.
Once you see the theme, you can just click “Install Now“.
Once the theme is installed, you just have to click the clickable link tat says “Activate” and the theme should already be in effect.
Creating Common Pages
Now that the theme’s already been added, let’s add your site’s menus and contents. I suggest that you start with the “About Us” page, the “Contact Me“, “Products“, etc… You can add more pages if you want but
You can add more pages if you want, but be having these are a good start. Take note that you DO NOT need to make a “Home” page since this theme has a special function for that (which I’ll tell you more about it later).
To create a page, you need to go to the “Pages” tab on the upper left part of the page then click “Add new“. It should then take you to the back-end of a page. You just need to type in the title and the content.
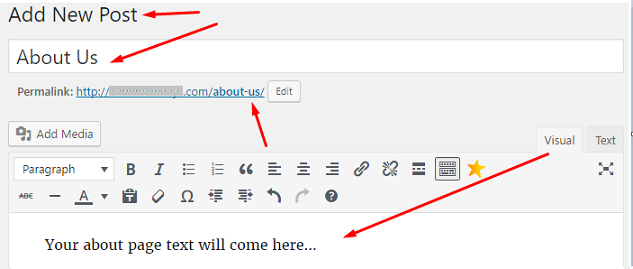
In this case, type in the title, “About Us” since we’re making the “About Us” page. You then have to type in the details of your “About Us” page then hit publish.
You should follow the same process to create the other pages.
Setting Up Menus
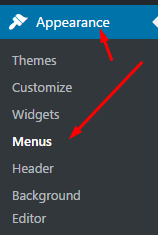 Once you’ve created all the pages, you then have to go to the “Appearance” tab on the left side of the page then click “Menus“.
It will then take you to the menu page where you can create a name for your menu. In this case, suggest that you use the name “Main”. After typing in the word name, click the Save button.
You then have to go to the Theme Locations tab on the left side of the page. Click the drop down on the “Primary Menu” section then choose the “Main” menu then hit save.
From there, you need to go to the lower left part of the page where it says “Pages” then tick the boxes for the pages you created. Once the boxes have been ticked, “click Add to Menu“.
You will then see the pages on the main menu and you can drag and drop the pages to the order that you see fit. After you’ve organized your pages just click save.
Now that we have all of your pages organized on the navigation bar. You then have to go to “Appearance” then “Customize“.
Click the “Static Front Page” tab on the lower left part of the page. Then click the “Your latest post” radio button then click the “Save and Publish” button.
At this point, your WordPress site is almost done. Now add a logo to your site so it looks professional. The “Customize” page will help you get that set up.
Some themes even have a separate page for ‘Theme Options’. Look around the WP backend on your site to see if your theme offers that.
At this point, your site is pretty much complete. Once you add posts and widgets (more about this at the bottom) to your site, it’s going to look professional. But if in case you don’t know how to add a post, allow me to help you with that.
Here’s How to Add a Post on your Site…
- Go back to your dashboard and click “Posts” then “Add new”.
- You then have to type in your post’s title and contents.
I suggest that you add images on your posts to increase its readability and entice the visitors to actually read your contents.
You then have to click the publish button on the right side of the page so your posts will go live. Here’s how it will look like on the front page of your site once you’ve published your content.
At this point, your WordPress blog site is all set-up. You can play around with the functions on the dashboard so you can customize your site even more.
Since you already have your blog site up and running, you just have to bring in visitors to your site through different kinds of marketing methods (discussed below).
An important point to remember when maintaining your blog is that you should post regularly (2 times or more a week) so your readers will like you and not to mention Google.
When creating a post, here are a few things that you should remember:
- Use keywords to help the search engines know what your site is about
One of the things we talked about above is how to research keywords. This is how and when you’ll use the keywords.
The safest way to go about this is to use 1% keywords density in your articles. That said, if you write a 500-word article, you must mention the keywords 5 times.
- Think about what your prospect readers want to read and not what YOU want to read
When writing a post, put yourself in the shoes of your readers. Think about them and not what YOU think is interesting.
A good tip to go about this is going to niche related forums. You can look for “Hot threads” or the ones with a lot of comments/views/interaction.
If the thread has a lot of interaction from the members of the forum, it’s a good indication that they find it interesting. And if they find it interesting, you can bet your family jewels that so will your readers.
- Convey sincerity and concern in your posts
Other affiliate marketers are into giving tips and advice to their readers. Aside from providing helpful tips, you should also take the time to sympathize and let your readers know that you are there to help them.
You need to let them feel that you’re concerned and that they can trust you. Remember that when trust is established, it’s A LOT easier for you to sell your affiliate products and create a meaningful connection with them.
- Add a clear call to action on EVERY POST
Having an interesting and useful content on your site isn’t enough. Once you’ve helped them solve their problems by providing quality content, you need to tell them CLEARLY what they have to do next.
Whether you want them to comment, sign-up or buy a product, you need to indicate this clearly within your article so they won’t feel lost on what they have to do next after reading your articles.
Alright! It’s amazing to see the kind of progress that you have at this point. If you had zero knowledge in affiliate marketing (let alone online marketing), then you’ve just had a jump start on your online career by having a blog site of your own.
You are now one of the many few that have their own website or their own online store.
Now that we’ve already set-up your website, let’s talk about adding an aStore on it. Since you have a “Products” page on your site, you can integrate your aStore to the product page so your visitors can view the full catalog of what’s on Amazon.
BONUS Tip #1: Adding an aStore
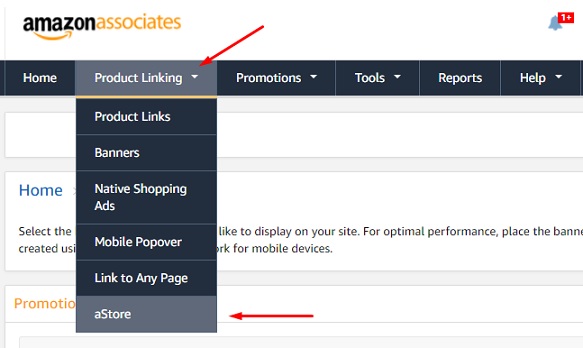
To create an aStore, you need to log-in to your Amazon affiliate account and click on “Product Linking” and then select “aStore” from the drop-down menu.
You then have to click the yellow “Add and aStore” button. Type in a tracking Id that you’d like to use for your aStore. In this case, I used “sampleaStore”. Click continue.
It will then take you to the “Create aStore” pages. Now there are several ways to go about this since at this point you’ll be customizing your aStore. But the way I do it is I check the “Hide the category navigation” box.

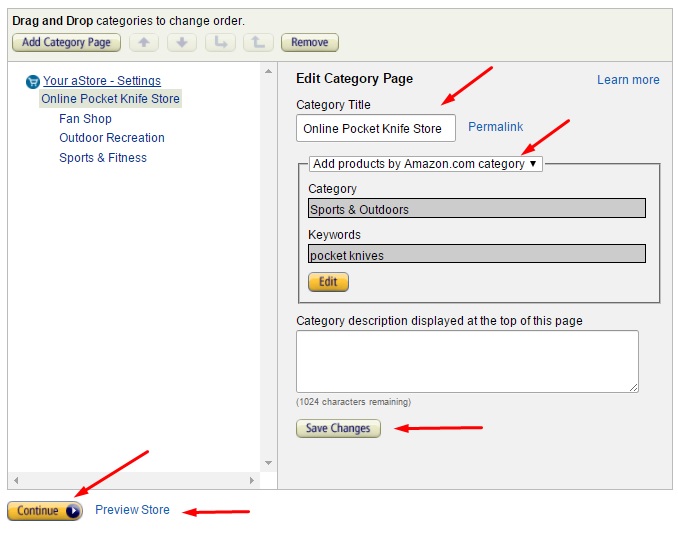
From there, you can then click the “Add Category Page“.
Change the category title to something that’s more fitting to the type of product that you’re selling. As an example, you can type in “Online Pocket Knife Store”.
You then have to click the drop down box that says “Add individual products” then select “Add products by Amazon.com category“. Then click the yellow “Select an Amazon.com category” button.
- You will then see a pop-up from the different categories that Amazon has. Just choose accordingly. In my case, I’ll select “Sports and Outdoors”. Be sure to click the “Include all subcategories for this category” box.
- You then have to type in the possible keywords that your prospects might type in when searching for your product. In my case, I’ll type in keywords like, “multi-tool”, “pocket knives”, “Swiss knives”, etc… You then have to click save
It will then take you to back to the “Create aStore Page“. You then have to hit continue.
You will then be able to see a preview of your aStore (Associates Store). You can customize the aStores color on this page by simply changing the values on the left side of the page.
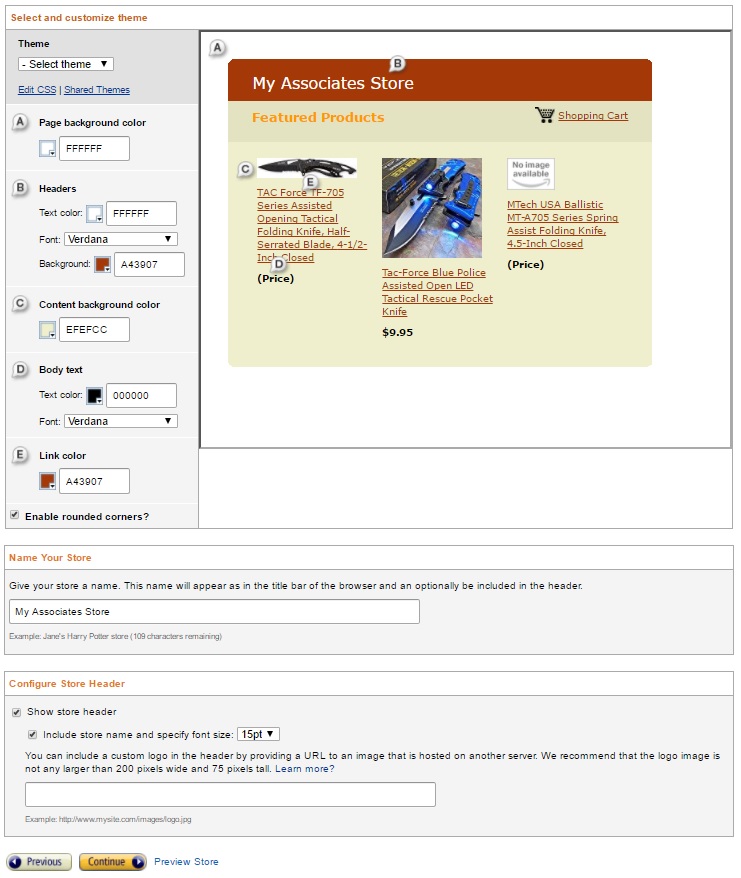
You can then name your store by typing in the name that you want on the “Name Your Store” section then uncheck the “Show Store Header” box on the “Configure Store Header” section of the page. Please click continue.
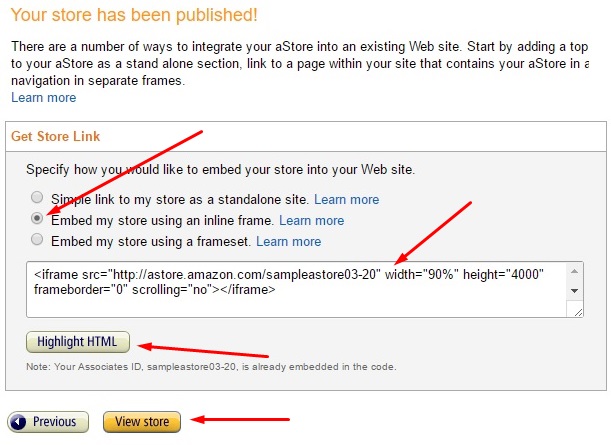
It will then take you to the “Sidebar Widgets” page where you can select which part of the aStore you want the sidebar to appear. This will of course depend on your preference then just leave all the boxes at the bottom and hit the “Finish and Get Link” button.
Among the three options presented on the page where it says “Your store has been published”, I normally go for the middle one that says “Embed my store using an inline frame“. You then have to highlight the HTML codes then copy it.
After you’ve copied the code, you then have to go to the “Products” page on your website. You can then paste the HTML code on the “Text” part of your page instead of posting it on the “Visual” tab.
From there, you need to look for the width and height of your aStore on your HTML codes (width=”80%” height=”4000″). Please change 80 to 100 and 4000 to 1000. That way, your store will fit exactly on your website’s page. You can then make the necessary arrangements on the width and the alignment from here.
This then ends the process of adding an aStore on your site.
Please note that there are several customizations you can make to your aStore. From the alignment, colors, categories (etc.), you can change it according to your site’s design, and theme (if you decide to use a different one).
Adding the links directly to your post
When writing content on your site for the specific product that you chose, you can add your images/texts (with links) within your content.
That way, the readers can see images of the product that you are promoting to give them a better idea of what/how the product looks like. This image is then embedded with your specific affiliate link.
Once they decide to buy, they just have to click on the image/link and it should route them to Amazon.com making you the referrer.
Note that to use the banner you simply have to copy and paste the HTML code that we mentioned above in your post.
BONUS Tip #2: Generating Traffic
As a general reference, here are some traffic generation methods that you can use.
Email Marketing
Make sure you’re capturing email leads from your site – because you’ll be able to contact those highly targeted people in the future.
If you don’t build your email list, then you’re just wasting all the traffic that hits your site and doesn’t convert on the first visit.
If you need some helpful tips on how to get more subscribers with WordPress, I recommend Anik’s email marketing advanced course: Inbox Blueprint 2.0.
Social media
Marketing via social media is an awesome way to get things started for your site.
It’s a lot easier to build a connection with your community through social media. An awesome way to do this is to post content that you’re sure that your community will love.
To ensure that your community is in fact interested in the content that you’re posting, you need to go to niche related forums and look for the “Hot Threads”.
These hot threads are the ones with the most replies, comments, and feedbacks. The fact that there are tons of people interacting in a specific thread implies that the actual topic of the thread is interesting for them.
You then use that thread’s topic in your post and add your money site’s link on your post.
Forum commenting
You’ll find that forum commenting is a good way to establish your authority on a specific topic. The more you comment and interact through forums the, the more people will find you credible when it comes to your specific niche (provided that you add meaningful posts).
Once your credibility is established, it’ll be a lot easier for them to buy from you since a level of trust has already been established between you and them.
Turning your articles to videos and posting the videos on YouTube
With how YouTube is the second largest search engine, it’s a must for you to market your product there as well.
Just so you can save time and not have to think about new contents, what you can do instead is turn your articles into PowerPoint presentation and make videos out of the presentation.
Once you’re done with making the PowerPoint, you can use Screenflow to capture the power point presentation and upload the video to YouTube.
When uploading the videos on YouTube, you need to make sure that your videos are keyword optimized. Since you can’t really do that on the actual videos since the search engines can’t crawl it, I suggest that you do these instead…
- Add your keyword on your video’s title. I suggest that the keyword or the keyword phrase should be the first phrases or words in your title.
- Add a transcript on the description of your video when you upload. Note that the transcript should have keywords on it. As a general rule, 1% keyword density should be safe and will suffice.
- Tag your video with the keywords. Add as many relevant tags as you can.
- At the end of your videos, you can also add links to your other videos so you can send traffic to it.
Web 2.0 Creation
You can create accounts at Medium, Hubpages, etc. and start the process of creating Web 2.0 properties that link back to your site.
With the rising number of users of these web 2.0 sites, failing to market on these platforms will cause you to miss out on the opportunities that they bring.
A good tip when using these web 2.0 sites is to add videos to them. At this point, you can use your YouTube videos. That way, all the contents that your visitors are viewing are yours. This helps in establishing to your visitors how you’ve mastered your niche.
Another benefit that these web 2.0 sites bring is – opportunities to connect with like-minded people or people that are willing to purchase your product. You can comment on other people’s sites and build connection, which can be very beneficial for both of you.
Once you’ve established a good connection with them, you can then ask them to mention your site on their posts and you can reciprocate what they’re doing.
Guest Posts
Guest posting is a powerful tool as far as building a meaningful connection with other webmasters and driving highly targeted traffic to your site.
When guest posting, here are things that you need to make sure.
- You must link to high PR sites or authority sites,
- Make sure that the site is HIGHLY RELEVANT to your niche,
- Take note of your velocity in back linking,
- NEVER SPAM.
Once you consider these 4 things when backlinking, you should pretty much be on the right track.
BackLinks
If you’re having a hard time looking for leads for your backlinks and filtering them in such a way that you ONLY have a high PR and high domain prospects, then this guide will help you.
Go to Google.com and change your search engines setting to show 100 results instead of 10 results only. You can do this by typing in your keyword in the search bar. Then click the “Gear-looking” button on the right side of the upper page and click “Advanced Settings“.
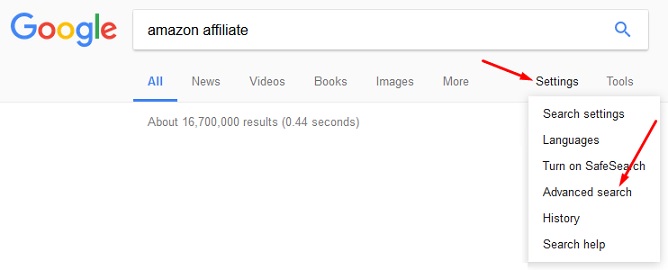
Then go to the “Search Settings“, and then choose “Never show instant results” from the Google Instant Predictions, then drag the box on the “Results per page” to the 100th results then click save.
You also have to download the “Scrape similar” software from the Chrome Web Store. You can find it by simply typing in the keyword “Scrape similar” on your Google search engine then click the first search result. Simply download it after that.
Now that you have the scrape similar software, you can just type in your keyword on Google’s search engine then right click on the first results. You’ll then see the software scrape similar then click on it.
You then have to click the “Export to Google Docs” button then you’ll see all the links of the search result on a Google doc spreadsheet.
Once you already have all the links you can go to the Mozcheck.com and enter all your links there. Note that there should only be one link per line.
Better yet, you can simply copy and paste your links from your Google docs to the space provided by Mozcheck.com. Remember that you should ONLY copy and paste the URL.
Please click the “Check Links” button on the lower left part of the page and wait for the results.
Once it’s done the checking, you should be able to see the results where the URL, Page Authority, Domain Authority, Mozrank, and External links.
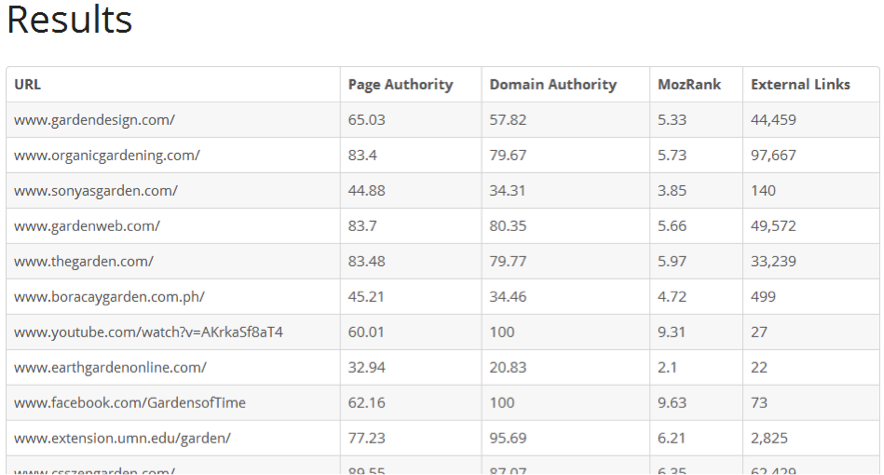
You can then copy paste this on your Excel spreadsheet, use the SEO for Excel tool get the page rank of the URLs then sort them and remove the links with no PR and Domain Authority that’s less than 30.
That way, you only have high-quality prospects for your link building.
Once you’re done with the whole process you should already have a long list of high PR sites with good domain authority that you can link to. From there you can start your outreach by sending them outreach emails for guest posts or for any kind of promotion.
If you do this part carefully and with enough thought, this should be good enough to get your off page SEO going.
Not only will you get traffic to your affiliate Amazon site through the links built but you’ll also see your website on the search engine results page (SERPs).
Conclusion
Alright! I hope you found this guide useful and promote Amazon products as an affiliate.
I tried to write this article in such a way that it’s easy to understand and comprehensive. If you feel like you still have any questions on the actual process that we discussed above, I urge you to share your questions in the comments section below.
As for those who’ve been marketing Amazon products as an affiliate for a while now, I also urge you to share your comments and suggestion in the comments section.
That way, a lot of newbies can get more insight on the topic and be able to succeed in their affiliate marketing business.
I hope to hear from you soon!
Are you yourself earning from affiliate marketing.
Or just like guru it’s pure theory
I used to earn a good amount from Amazon affiliate program. Still earn from different affiliate programs, but not Amazon.
Hi there, and thanks for your amazing insight on this article. It’s very helpful the way you have outlined all steps providing snapshots etc. I am taking the first steps in this direction, and currently doing research in building a blog and becoming an affiliate marketer with Amazon. And i found this to be one of the most informative articles out there on the subject. Thank you again. Look forward to getting some more tips from you!
Thank you so much Ravi. Keep hustling.
what no comments on this excellent well thought out article, i love this article, i was confused for a year now I understand. Thank you please make more on website making in word press. I cneed more info on what widgets to use so the site is safe and productivity please
I’ll be working on more detailed affiliate marketing posts in the future.
Can you throw some light on how to use ads strategy for Affiliate marketing purpose?
The basics remain the same that I teach for eCommerce. Its all about audience, copy, and angle