
The question on many WP blog owners: How to build an email list with Wordpress?
I’ve managed several dozen WordPress sites and this is my guide to get your started with list building using your WordPress blog within the next 15 minutes.

It’s better to have one email subscriber from a hundred visitors than zero.
I’ve long maintained that it’s important to keep increasing your email list.
No matter what business you’re in, having a growing email list will always be an asset to drive customers, visitors, and future leads.
While there are a lot of ways to drive optins, and I’ve already talked about one of my favourites, solo ads, as well as other paid advertising.
Today, I’ll talk about a not-so-unique method which literally guarantees success.
I ran this personal blog for several years.
I didn’t have any optin form on my blog, hence none of my posts – no matter how engaging they were – weren’t adding to my bottom line.
Sure, I could drive some sales by putting links to my products in my blog posts. But I wasn’t capturing any email addresses.
Essentially, I was losing out on all the visitors who found my site through the search engines or social media.
Later I realized, I should squeeze every visitor’s real worth and the best way to do that was by embedding optin forms on this blog.
If you’re into blogging or even if you’ve just started blogging, there are several things you can do to build your optin list simply via your blog.
It doesn’t take much time to embed optin forms on your blog especially if you’re running WordPress, which pretty much powers about 75 million blogs online.
There are different places where you can strategically place optin forms, that are both non-intrusive yet visually appealing.
You have to make sure your content is always top priority. But no one’s stopping you from monetizing your blog any way you can.
The following are my favourite locations for placing an optin form. So if you’re ready, set your countdown timer to 15 minutes and place optin forms on each of these locations on your WordPress blog.
Top bar – 2 Minutes
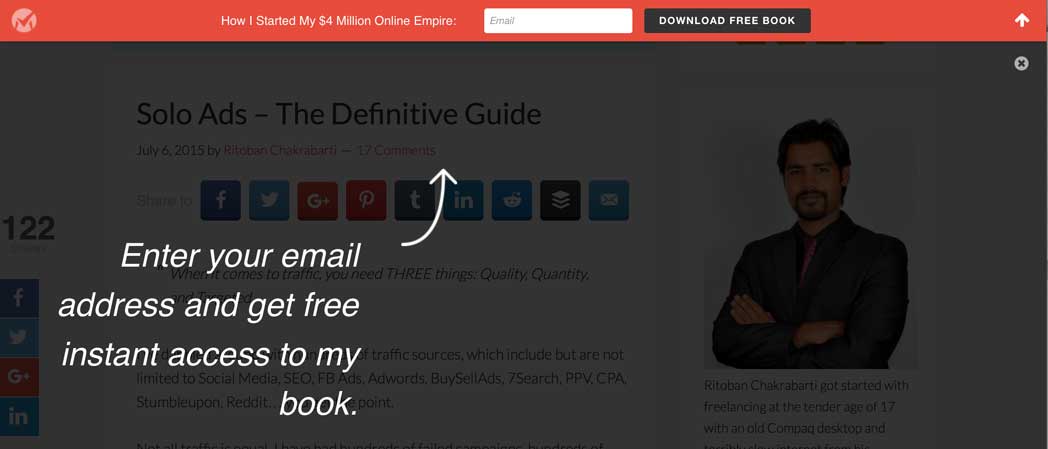
This has proven to be, by far, the highest converting optin widget on my blog. I’ve been using the ManyContacts bar and I split tested it with Hello Bar.
ManyContacts won hands down primarily because it has a neat overlay text and arrow for new visitors that drives attention towards the optin form and drives leads my way.
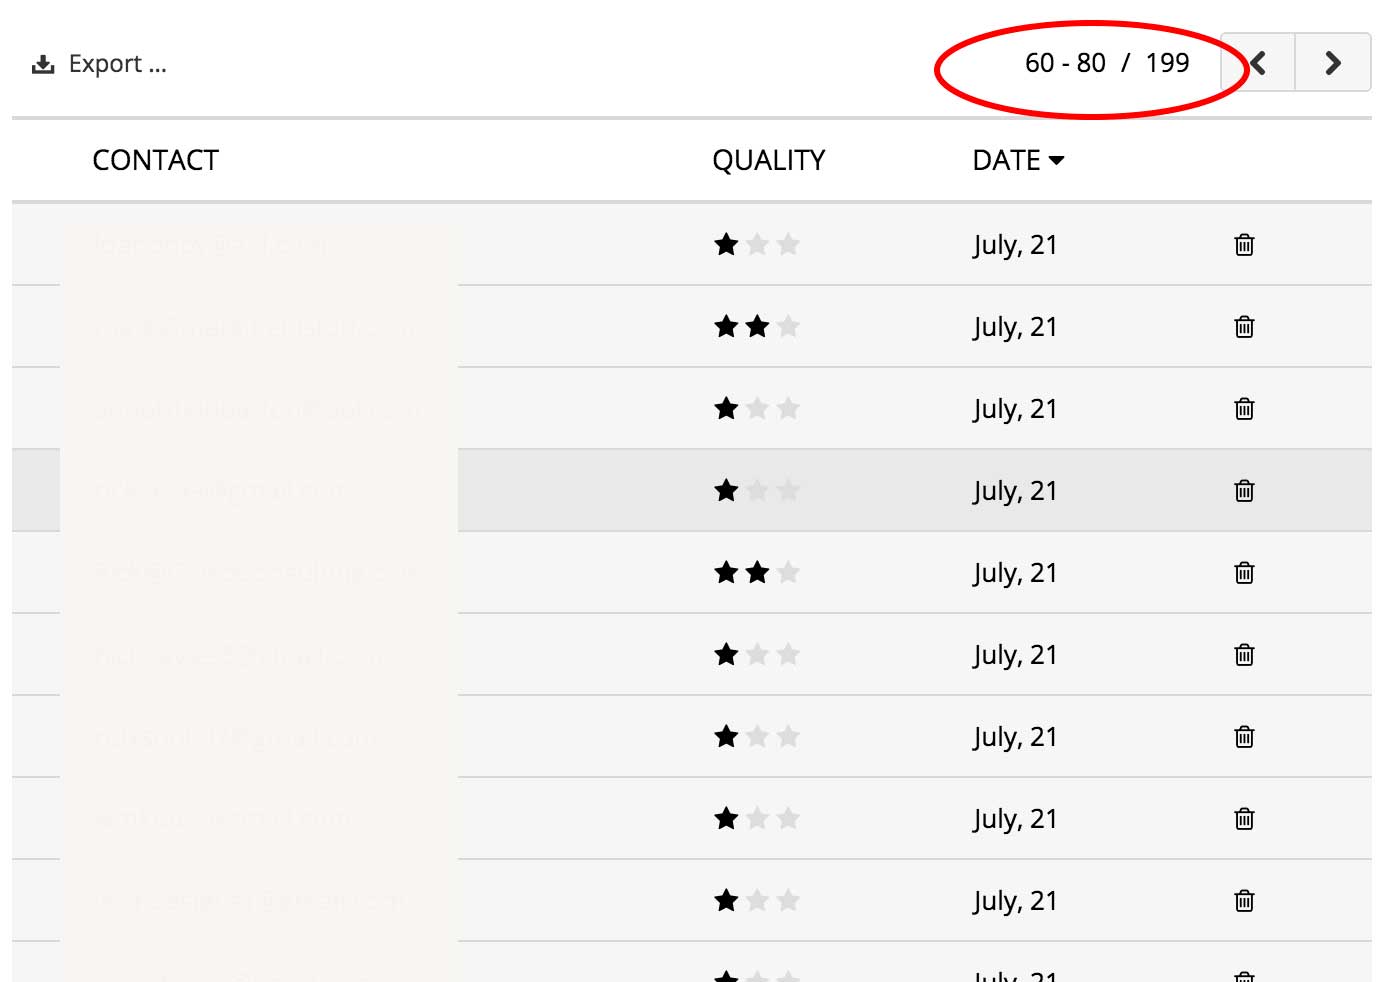
Here are the stats of the optins I got after I published my Solo Ads post
I recommend trying out HelloBar as well as ManyContacts, and see what works better for you. There are other free WordPress plugins like WP Top Bar, and Icegram.
BTW, Icegram also lets you publish notifications, footer bars, and messengers.
Here’s how to setup ManyContacts the right way.
Step 1: Go to ManyContacts.com and setup an account.
Step 2: Enter your website URL and click the Create a New Bar button.
Step 3: Pick a color, enter your headline text, enter your thank you text, optionally enter the URL where you want your visitors to go after opting in, and finally make sure you have the overlay checkbox checked.
Step 4: Download and install their WordPress plugin on your blog and voila!
You can also run split tests with ManyContacts to test out different headline texts.
The only weird catch being you have to export the list of contacts saved with ManyContacts and upload them to your email marketing service regularly.
Sidebar – 5 Minutes

This is one of the most common locations for placing an optin box.
There are several plugins out there that let you embed a neat optin form on your blog’s sidebar.
The key part here is that it should stand out from your blog’s design. Use a color palette that matches with your blog but still ensures the box stands out.
Don’t worry.
People are used to seeing optin forms on blogs and it’s not going to interfere with the readability of your content.
The easiest way to setup a sidebar optin box is to create a web form on your email marketing service and grab the HTML code from there and place it in a text/HTML widget on your WordPress sidebar.
I’m using the Genesis theme for my blog and it comes with a widget plugin called eNews Extended. I installed it and set it up with some minor CSS tweaks to match the color scheme of my blog.
Bottom of every post – 5 Minutes

I don’t like including the author bio at the bottom of every post. Especially because I’m the solo author on this blog. But for those visitors who have read my entire post and reached the bottom of it, there’s a neat little optin box that stands out and invites people to enter their email address.
If a person has taken the time and gone through your entire blog post, then there’s a high probability they would want to be connected with you.
There is an impressive free plugin that lets you do exactly that and it’s called Optin Forms.
Here’s how to set it up:
Step 1: Download the plugin from WordPress and install it on your blog.
Step 2: The plugin is pre-configured to work with Aweber, GetResponse, Madmimi, Mailchimp, iContact, and Interspire. Enter the webform ID, list ID, form action URL (based on which provider you are using).
Step 3: You have 5 different form designs to choose from and make sure you choose a design that goes well with your blog. You can customize the box pretty easily by choosing the colors you want, the headline, subheadline, button text, disclaimer, fonts etc.
Step 4: Choose where you want the form to be displayed. You can have it shown after the first paragraph, or the second paragraph, or at the bottom of every post (like I did). And you can also choose to exclude it from specific posts and pages as you may desire.
All in all, a pretty straightforward and simple plugin that does what its supposed to and works very well to drive those optins to your list.
Popups – 3 Minutes
There are several ways to include optin popup boxes on your blog.
I’ve used the Leadpages popup myself and it works wonderfully well on one of my blogs.
You can set a delay of xx seconds and have the popup appear to only first time visitors.
You could also try using an exit alert box or an exit intent popup.
I don’t particularly prefer the exit alert on my blogs. They’re better suited for sales funnels where I’m paying for traffic and I want to squeeze out every last cent.
Exit intent popups, on the other hand, are pretty damn effective because they pop up JUST as your mouse leaves the window.
Quite eye-catching.
While there are apps like Bounce Exchange that let you embed neat exit intent popups, if you want to save up some money then try out HelloBar and this WordPress plugin.
There’s another suite of conversion tools offered by the guys at Appsumo called SumoMe.
After you install their code on your site, you can get a host of features like heatmaps, popup list builder, and share buttons.
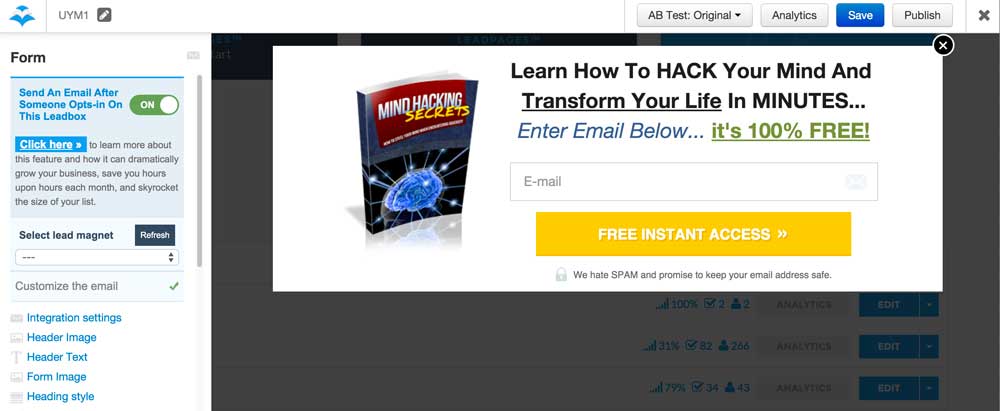
Here’s how to setup a Leadpages popup on your blog:
Step 1: If you’re not on Leadpages already, then sign up because you open a world of stunning landing pages and conversion mania.
Step 2: Setup a Leadbox on their web based backend. It’s really easy. All you need to do it enter an image (optional, but recommended), enter a headline, enter a subheadline, change the button color and text to your liking and save it. You can even integrate it with your favourite email marketing service.
Step 3: Choose the publishing options that works best for you. You can choose WHEN and HOW the Leadbox will be shown. You can either choose a Popup version, a link/button version, or even an exit intent version. If you choose the popup version, then you can mention after how many seconds you want your Leadbox to be displayed, and also if it’s a regular visitor then you can choose to display the Leadbox after x number of days.
Step 4: Install the Leadpages WordPress plugin on your blog and choose the Leadbox you just created to be displayed on your site.
Interstitials (optional)
There’s another idea that I haven’t tried out yet, but I’ve seen several big blogging publishers use on their blogs.
The homepage of your blog could be a squeeze page. Or place a summon heading interstitial on the top.
Sumome provides an interface for creating such interstitials that roll up to the top of the page and covers the entire viewport. If a person chooses to not optin, they can simply scroll down to your regular site.
Interstitials and Popups can be very effective for new visitors on your site but can be obtrusive for your regular readers.
You could place a cookie whenever a visitor subscribes to your email list from any of the above mentioned locations so that you can choose to NOT show optin forms to them again and again.
Connect Optin Boxes to Sales Funnels
If you’re spending all this time and energy on creating the best content possible, then it’s imperative that you generate some revenue with it.
Apart from banners and links on your blog leading to your products or affiliate promos, I suggest linking your optin forms to a sales funnel.
For example, the optin boxes on my blog are linked to my Email Instruments sales funnel.
When you opt in, you’re taken to download my free book called the Email Lifestyle.
There’s a link to proceed to my sales page right there. And that’s where the sales begin to flow.
Even my first few autoresponders talk about Email Instruments.
Not only do you add subscribers to your email list, you also get to generate a direct revenue from your blog posts and content creation.
Little by Little, One by One
If you’re just starting out with blogging and don’t have much traffic, be patient.
Embed optin forms on your blog and try to convert as many visitors to subscribers as possible. Slowly, the numbers keep improving.
In fact, when you write a new blog post, send an email to your list.
They opted in your list, so they are definitely interested in reading what you post next. It’s important for new bloggers to see results and the best tool in your arsenal is your email list that you can blast out whenever you publish – resulting an initial eyeballs to your content.
Conclusion
I read a lot, A LOT of blogs and I’ve noticed optin forms on most of them. If you’re not doing it, then what’s stopping you?
Take out 15 minutes of your time today, install the plugins I’ve mentioned in this post and setup optin forms. Start raking in those leads from today. Make the most of your traffic.
If you are doing something awesome on your WordPress site to generate subscribers, I would love to hear about it. Let me know in the comments section below. I attempt to reply to every comment, so comment below if you have any questions.
Hey Rito,
I am facing problems to start my Dropshipping business due to budget issues and that is also because I’m a 17-year student from India. I have pretty much knowledge about the online world and Dropshipping.
So can you suggest me the minimum budget needed to start the business at a minor level so that I can get started with it
Please watch my ‘minimum investment required’ video and also the video on ‘how to start dropshipping at 16’
I learnt alot of new concepts on the Email Lifestyle.Its something that is not thought in the schools.I have to read second time again to understand well the idea behind it before I implement the step to create a lead or opt i page.
Thank you,
Best Regards
George Tone
Glad you enjoyed the concepts.