
Welcome to Day #6 of the First Sale Sprint Challenge!
First things first, if you haven’t started with Shopify, click here.
This week we’re building a profitable Shopify store from the ground up!
Only it’s not our store. We are building this store for one of our students.
Today we cover the first steps you’ll need to take in order to be successful with Shopify and drop shipping.
Follow along as Rito simplifies the setup process right before your eyes:
As of right now, Day 6, Nigel’s store has already begun to generate sales!
Today we are going to cover more in depth what to do after your first sales start rolling in.
We’ll also cover retargeting ad campaigns, which are tremendously effective at generating sales that wouldn’t have otherwise happened.
This is something many people struggle with:
“I’ve gotten my first sales, but what do I do next?”
Well, we’re about to show you, so pay attention and take action…
Lucky Orange
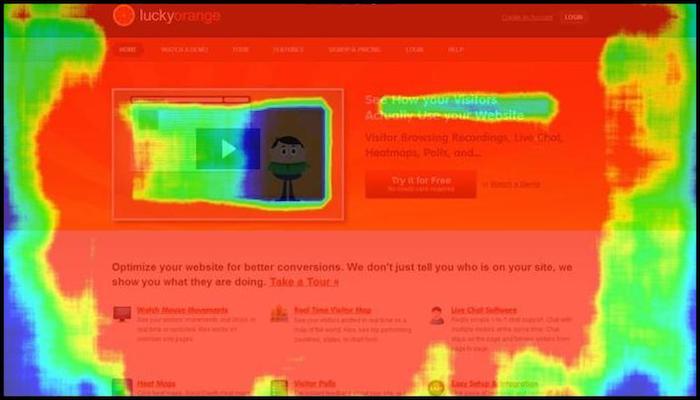
Heatmaps reveal quite a bit of customer data.
You can see exactly where they focus their attention, for how long and when they go after.
If you have a high bounce rate, it’s relatively easily to discover why.
These are the 4 Shopify hacks our heatmaps reveals…
Heatmap Hack #1 – Smart Shopify Homepage Design
The homepage is the first page customers see, and it needs to be full of products.
Aside from top products, your header navigation needs to be present, as well as your footer navigation.
You can see how we laid out UrbanSigma for inspiration.
This is what every Shopify homepage needs:
- Primary Categories
- Best Selling Products
- Header Navigation
- Footer Navigation (with links to shipping, refund and privacy policies)
Heatmap Hack #2 – Converting Product Page
This is the most important page on your Shopify Store.
It’s the page where visitors can actually purchase your products.
Similar to your homepage, the product page has four primary aspects:
- Visual Product Description (include images)
- Countdown Timer (scarcity sells)
- Related Products (below primary listing)
- Loox Reviews (app that delivers social proof)
Heatmap Hack #3 – Optimized Cart Page
More than 90% of store owners ignore this.
And because of that, a lot of people see prospects dropping off at the cart page.
Your cart page should include some copy that reiterates the scarcity and encourages the immediate completion of the sale.
Again, you can checkout UrbanSigma for inspiration.
Heatmap Hack #4 – Branded Checkout Page
You checkout page should be on a white background.
The other colors should match the colors from the rest of your website.
Additionally, be sure to include your store logo, like you would for any other page.
This is all easily customizable from within your Shopify dashboard (“Theme Customizer”).
Finally, you’ll also want to have a countdown timer on your checkout pages as well.
Lucky Orange will help answer why 99% of visitors never turn into customers.
You can identify the exact moment a visitor left your Shopify Store, and why.
Launch Retargeting Ads
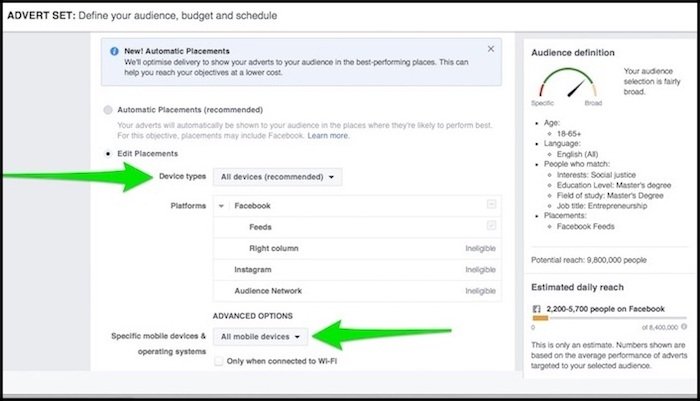
Simply login to “Audiences” from within Facebook Ads Manager and create a new campaign or ad set, and build two levels of retargeting.
First is going to be for those who have visited your product page but did not add anything to their shopping cart.
Second we will retarget for those who added products to their cart but didn’t purchase anything.
For these customers we need to very slightly modify our ad copy in order offer a discount aka purchase incentive aka that extra nudge.
Again, duplicate whichever winning ad sets you have so far, then modify them accordingly in order to continue scaling.
Viewed Content Custom Audience
First things first, we are going to retarget the people who viewed content but didn’t add anything to their cart.
We will target people who viewed your Shopify store content within 2, 5 and 15 days.
This means a new ad set for each new time frame for this particular audience. You can simply duplicate your ads and edit the info accordingly.
Each ad will link to a different type of product and trigger based on the assumed reason the customer left. For instance:
- Customer visited the store within 1-2 days gets shown a better price
- Customer visited the store within 3-5 days gets shown a related product
- customer visited the store within 6-15 days, gets shown a dynamic ad with multiple products
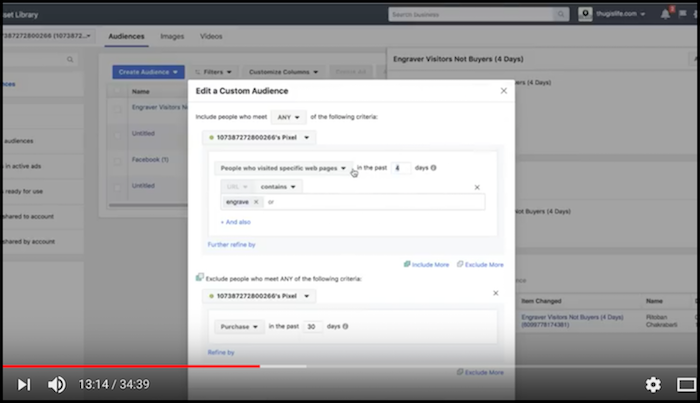
Here’s how to create a Facebook ad with a custom audience for Viewed Content:
- From within Facebook Business Manager click “Asset Library” and select “All Tools”
- On the next screen, underneath “Assets” click “Audiences”
- Click “Create Audience” on the next screen and then select “Custom Audience”
- Select “Website Traffic” when prompted on the following screen.
- Now you can create your custom audience. Select “ALL” from the drop down box
- Just underneath this you’ll see a drop-down menu, select “People who visited specific web pages”
- Now, just next to this where it says “URL Contains”, just paste the last portion of your URL. If it were this post page, we’d use “retargeting-shopify” (see 13:55 of the video for another example)
- Below all of this to the right of the page, you’ll see something that says “exclude” click it.
- Now select from the drop down menu “Add To Cart” and enter “2” days in the fields where prompted on the same page.
- Name it “VC No ATC (2 Days)” so you know which ads are which.
- Finally, click, “Create Audience” and within a few minutes the ad will be live.
Now rinse and repeat this process for each of the time sets mentioned above.
Add To Cart Custom Audience
Next up, we will create an ad set focusing on on audience that added a product or products to their cart but never completed the purchase.
For these ad sets, target people who added a product to their cart without purchasing within the last 2, 5, 10 and 15 days.
Be sure to include “Add To Cart” and exclude “Purchase” when setting up this audience.
Here’s what to do:
- From within Facebook Business Manager click “Asset Library” and select “All Tools”
- On the next screen, underneath “Assets” click “Audiences”
- Click “Create Audience” on the next screen and then select “Custom Audience”
- Select “Website Traffic” when prompted on the following screen.
- Now you can create your custom audience. Select “ALL” from the drop down box
- Just underneath this you’ll see a drop-down menu, select “Add To Cart”
- Now, just next to this where it says “URL Contains”, just paste the last portion of your URL. If it were this post page, we’d use “retargeting-shopify” (see 13:55 of the video for another example)
- Below all of this to the right of the page, you’ll see something that says “exclude” click it.
- Now select from the drop down menu “Add To Cart” and enter “2” days in the fields where prompted on the same page.
- Name it “ATC NO VC (2 Days)” so you know which ads are which.
- Finally, click, “Create Audience” and within a few minutes the ad will be live.
Now rinse and repeat this process for each of the time sets mentioned above.
Purchase Custom Audience
This one is self explanatory.
If a customer has already proven they’ll buy from you once, they’ll likely buy from you twice.
Very much like the steps above, perform the following to target existing customers:
- From within Facebook Business Manager click “Asset Library” and select “All Tools”
- On the next screen, underneath “Assets” click “Audiences”
- Click “Create Audience” on the next screen and then select “Custom Audience”
- Select “Website Traffic” when prompted on the following screen.
- Now you can create your custom audience. Select “ALL” from the drop down box
- Just underneath this you’ll see a drop-down menu, select “Purchase”
- Now, just next to this where it says “URL Contains”, just paste the last portion of your URL. If it were this post page, we’d use “retargeting-shopify” (see 13:55 of the video for another example)
- Below all of this to the right of the page, you’ll see something that says “exclude” click it.
- Now select from the drop down menu “Add To Cart” and enter “2” days in the fields where prompted on the same page.
- Name it “CUST NO VC NO ATC (2 Days)” so you know which ads are which.
- Finally, click, “Create Audience” and within a few minutes the ad will be live.
Website Visitors Custom Audience
Once again, perform the following to target existing customers:
- From within Facebook Business Manager click “Asset Library” and select “All Tools”
- On the next screen, underneath “Assets” click “Audiences”
- Click “Create Audience” on the next screen and then select “Custom Audience”
- Select “Website Traffic” when prompted on the following screen.
- Now you can create your custom audience. Select “ALL” from the drop down box
- Just underneath this you’ll see a drop-down menu, select “Visitors”
- Now, just next to this where it says “URL Contains”, paste the last portion of your URL. If it were this post page, we’d use “retargeting-shopify” (see 13:55 of the video for another example)
- Below all of this to the right of the page, you’ll see something that says “exclude” click it.
- Now select from the drop down menu “Add To Cart” and enter “2” days in the fields where prompted on the same page.
- Name it “CUST NO VC NO ATC (2 Days)” so you know which ads are which.
- Finally, click, “Create Audience” and within a few minutes the ad will be live.
Rinse and repeat this process for each of the time sets mentioned above.
Products & Ad Descriptions
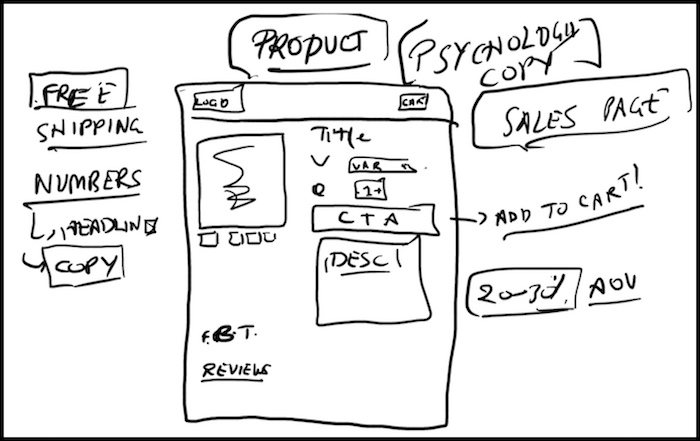
Don’t just write the same old product description as everybody else.
That won’t help your product stand out or sale.
Instead write a fun description in your own voice utilizing the story-selling approach.
Talk about the time you first used the product to do whatever it does and how awesome it was. Be concise, but not boring.
Utilize Real Life Images Whenever Possible
Stock images are often times tacky and come off fake.
People have a keen awareness for authenticity and stock images do not convey it. Whenever possible use product images that look real. Like somebody whipped out their camera and took the picture.
It’s much easier to relate to a real image.
Also, always include multiple image angles for consumers to get a full view of the product.
Strong Call To Action (CTA)
A strong call to action maintains your flow, and continues to direct the customer.
It can be as simple as the following:
- Get Yours Here
- Get Yours Today!
- Tag A Friend
- Don’t Miss Out, Join Now!
- Add To Cart
It’s important that your main call to action on a Shopify store page is above the fold (viewable without scrolling).
Nudge Consumers To Purchase With Scarcity
This one is pretty self explanatory.
Most consumers whether they realize it or not, have a fear of missing out. It’s part of being human.
You can tug on these string in order to help boost conversion by utilizing any of the following:
- Showing A Countdown Timer
- Displaying The Amount of Remaining Stock
- Limited Time Discount Prominently Displayed
- Limited Time Bonus For First (Insert Number) Customers
Always Offer FREE Shipping
The word “free” is a major psychological trigger.
And when it comes to successfully promoting Shopify store products, factor the cost of shipping into your price so you can claim “FREE” shipping.
Nobody wants to pay more for anything. Especially when shipping costs are often calculated after products have been added to carts.
This one is simple, but crucial for conversions.
Install An Abandonment Protector
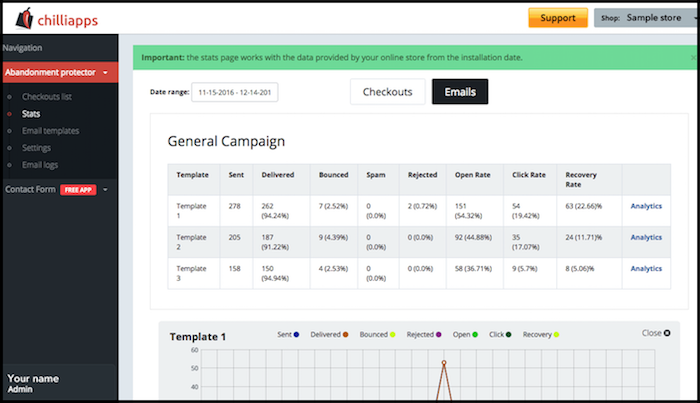
Abandonment Protector, like the two aforementioned options, is a specialized App that detects when customers abandon a shopping cart.
With easy to use tools, you can implement cart recovery for your store by sending advanced email campaigns depending on the value of the cart, date range, etc.
It offers a detailed stats page and additional tools to help you improve your abandoned cart recovery.
Install Product Upsell Shopify App
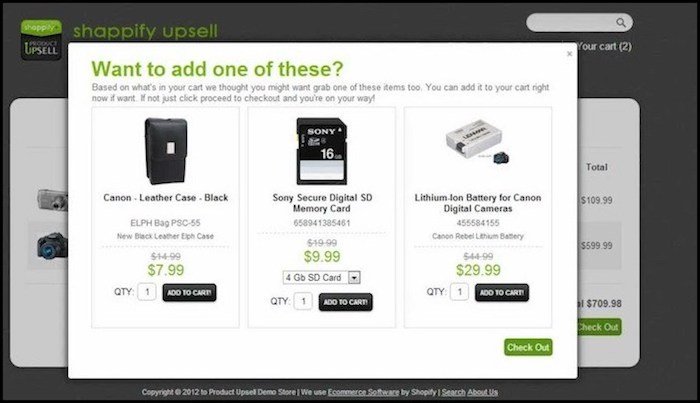
Product Upsell is another Shopify app and you can download here.
This app allows you to offer relevant add-ons, or upgrade specific products based on customer cart content, total cart value, or even a combination of both.
With the upsell app you’ll have the ability to create as many offers as you want and present them customers at the last moment before the point of checkout.
You can offer a single product, multiple products, or something based specifically on what’s already in their cart.
For example, if they buy a GoPro you can offer them a waterproof case to go along with it, but if they buy a Macbook Pro you can offer them a laptop case.
That’ll do it for Day 6 of the First Sale Sprint – Well done!
Stay tuned for the 7th and final day of our Shopify Challenge.
We’ll make our final adjustments, and review everything prior to handing the reigns over to Nigel of UrbanSigma.com
Questions, comments or just want to say hi? We love hearing from you below.
Success by choice, not by chance,
-David Aston
P.S.
If you’re not kept in the loop via our #Bizathon list be sure to sign up today.