If you want to get more subscribers for your membership site, pay close attention.
Video Sales Letters or VSL’s for short are a POWERFUL way of driving membership sales, and even for selling low-ticket offers.
Yesterday, I wrote the VSL Copy which laid down the foundation for the video shoot today.
In today’s “15-Minute Sprint“, which lasted longer than 15 minutes but I couldn’t stop the shoot in the middle – I was able to go into Zen Mode and shot the entire VSL in ONE TAKE. This is one session you just cannot miss:
Vidception
Today’s sprint was very challenging on many levels.
- I had to shoot the complete VSL in one sitting and one take.
- I had to make sure all the elements of the VSL were properly arranged and ready to bring into play when needed.
- I had to make sure the laptop didn’t crash, otherwise 😐
- I had to get focused and deliver a fantastic session on top of the VSL recording.
All said and done…
I was able to shoot the complete VSL from start to finish – all on a LIVE STREAM with an audience watching my every move.
Here’s how I did it…
Step #1: Prepare The Script
We were able to prepare a lot of the script in yesterday’s session. For today’s session, I had my notes handy which gave me the confidence to go at it in one sitting.
But it’s super important to make sure you have the entire script ready BEFORE you record even one word of your video sales letter.
And to prepare the script, all you need to do is follow the Copywriting Academy 5-Step system.
Step #2: Prepare the Presentation
I used Keynote to prepare the presentation, but you can use MS Powerpoint as well.
I do believe MS has an Office Cloud subscription model nowadays so your barrier of entry is pretty low.
But here’s the thing:
Don’t OVERDO it! Keep it super simple. You’ll see the presentation I did was basically black text on white in a large font.
That’s it!
No fancy animations.
No filters or objects or backdrops etc.
For images, I literally just imported them from my computer and placed them on the Keynote slide.
Keep it simple – at least for your first run.
If you’re a veteran at creating VSL’s – why are you even reading this?
Step #3: Lay Down The Plan
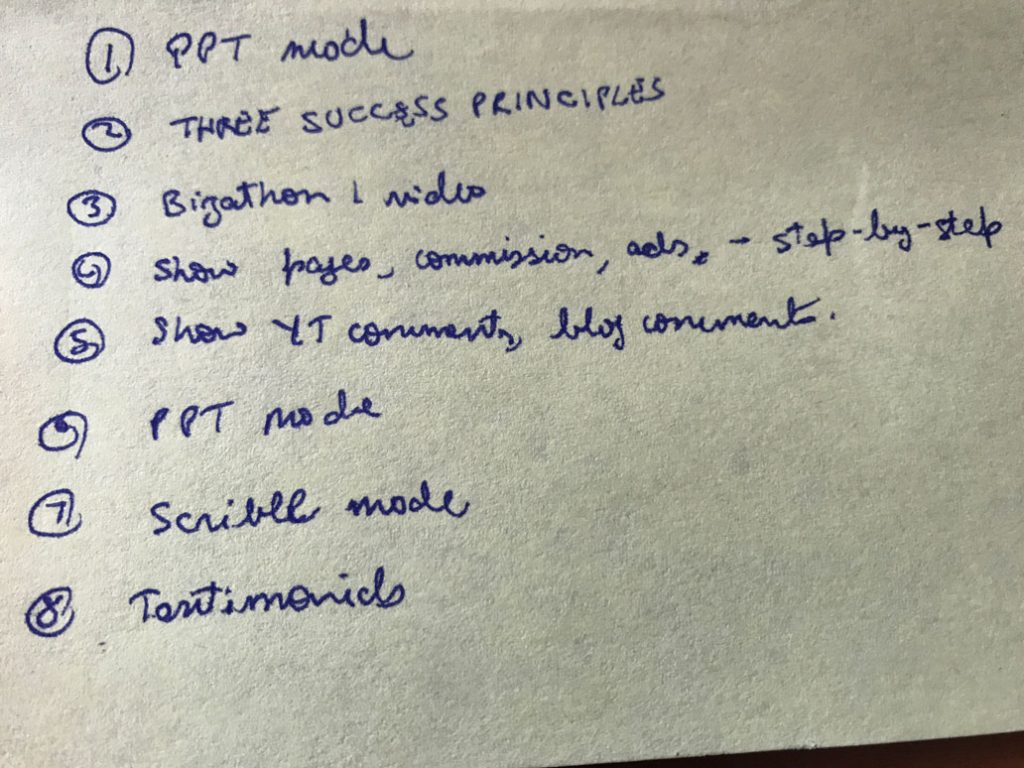
I had my entire plan laid down on a piece of paper.

I knew what I needed to do step-by-step.
Because if you don’t have a plan handy – you’ll need to do multiple takes and that involves shooting multiple videos and then joining them all together.
Too much work!
Again, keep it simple.
Preparation is KEY with VSL’s.
Step #4: Arrange all Elements
In my VSL, I use multiple elements:
- Keynote Presentation
- Scribble Pad
- Browser Tabs
- Video in Video
I had all my elements arranged, including all browser tabs in the order I wanted to showcase them.
One major element is AUDIO – so make sure your audio is tested and working before hitting the record button.
You’ll see me work the magic in the video above – seriously, don’t miss it.
Step #5: Zen Mode
Whenever I need to do something that’ll make me nervous, I just take a few deep breaths.
Helps drown out the noise and gets me in focus for the challenge ahead.
Once you’re ready, hit the record button and just GO!
I hope you enjoyed today’s session. If you did, let me know in the comments below:

