We build businesses from Scratch every 30 days – The Bizathon Challenge!
If you haven’t started with Shopify, you’ll want to by clicking here.
Because this month we’re building a profitable Shopify store from the ground up!
Yesterday we revealed Pre-Checkout Upsells For Your Shopify Store.
Today we cover the basics of “Facebook Retargeting” for maximum profits.
Follow along as Rito sells products before the customer reaches checkout:
Strap in boys and girls, today’s a fun one!
Take notes, take breaks, and take action as you work through the material.
While we are definitely going to be attracting more visitors, the real point of today’s lesson is to maximize the traffic you’re already getting.
After you find your winning product, this post shows how you’ll continue to scale.
While the Facebook Retargeting Journey is a low cost approach to scaling your Shopify business, it does require a bit of setup.
But here’s the kicker – when most Shopify stores are just starting out, you’re only dealing with one or two products that are winning (converting) so far.
And because it’s only one or two Shopify store products that you’re promoting, the retargeting journey is going to be a very simple one.
The entire point is to maximize the traffic you are already getting with your existing winning products by retargeting custom audiences for each new Facebook ad set you’re about to create.
You will be creating a total of 10 custom audiences for each of your converting products.
Here’s what to do…
Facebook Retargeting Hacks To Maximize Sales
Viewed Content Custom Audience
First things first, we are going to retarget the people who viewed content but didn’t add anything to their cart.
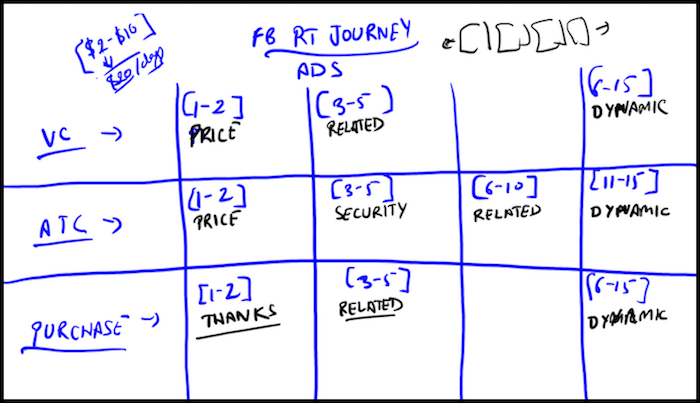
We will target people who viewed your Shopify store content within 2, 5 and 15 days.
This means a new ad set for each new time frame for this particular audience. You can simply duplicate your ads and edit the info accordingly.
Each ad will link to a different type of product and trigger based on the assumed reason the customer left. For instance:
- Customer visited the store within 1-2 days gets shown a better price
- Customer visited the store within 3-5 days gets shown a related product
- customer visited the store within 6-15 days, gets shown a dynamic ad with multiple products
Here’s how to create a Facebook ad with a custom audience for Viewed Content:
- From within Facebook Business Manager click “Asset Library” and select “All Tools”
- On the next screen, underneath “Assets” click “Audiences”
- Click “Create Audience” on the next screen and then select “Custom Audience”
- Select “Website Traffic” when prompted on the following screen.
- Now you can create your custom audience. Select “ALL” from the drop down box
- Just underneath this you’ll see a drop-down menu, select “People who visited specific web pages”
- Now, just next to this where it says “URL Contains”, just paste the last portion of your URL. If if were this post page, we’d use “retargeting-shopify” (see 22:25 of the video for another example)
- Below all of this to the right of the page, you’ll see something that says “exclude” click it.
- Now select from the drop down menu “Add To Cart” and enter “2” days in the fields where prompted on the same page.
- Name it “VC No ATC (2 Days)” so you know which ads are which.
- Finally, click, “Create Audience” and within a few minutes the ad will be live.
Now rinse and repeat this process for each of the time sets mentioned above.
Add To Cart Custom Audience
Next up, we will create an ad set focusing on on audience that added a product or products to their cart but never completed the purchase.
For these ad sets, target people who added a product to their cart without purchasing within the last 2, 5, 10 and 15 days.
Be sure to include “Add To Cart” and exclude “Purchase” when setting up this audience.
Here’s what to do:
- From within Facebook Business Manager click “Asset Library” and select “All Tools”
- On the next screen, underneath “Assets” click “Audiences”
- Click “Create Audience” on the next screen and then select “Custom Audience”
- Select “Website Traffic” when prompted on the following screen.
- Now you can create your custom audience. Select “ALL” from the drop down box
- Just underneath this you’ll see a drop-down menu, select “Add To Cart”
- Now, just next to this where it says “URL Contains”, just paste the last portion of your URL. If if were this post page, we’d use “retargeting-shopify” (see 22:25 of the video for another example)
- Below all of this to the right of the page, you’ll see something that says “exclude” click it.
- Now select from the drop down menu “Add To Cart” and enter “2” days in the fields where prompted on the same page.
- Name it “ATC NO VC (2 Days)” so you know which ads are which.
- Finally, click, “Create Audience” and within a few minutes the ad will be live.
Now rinse and repeat this process for each of the time sets mentioned above.
Purchase Custom Audience
This one is self explanatory.
If a customer has already proven they’ll buy from you once, they’ll likely buy from you twice.
Very much like the steps above, perform the following to target existing customers:
- From within Facebook Business Manager click “Asset Library” and select “All Tools”
- On the next screen, underneath “Assets” click “Audiences”
- Click “Create Audience” on the next screen and then select “Custom Audience”
- Select “Website Traffic” when prompted on the following screen.
- Now you can create your custom audience. Select “ALL” from the drop down box
- Just underneath this you’ll see a drop-down menu, select “Purchase”
- Now, just next to this where it says “URL Contains”, just paste the last portion of your URL. If if were this post page, we’d use “retargeting-shopify” (see 22:25 of the video for another example)
- Below all of this to the right of the page, you’ll see something that says “exclude” click it.
- Now select from the drop down menu “Add To Cart” and enter “2” days in the fields where prompted on the same page.
- Name it “CUST NO VC NO ATC (2 Days)” so you know which ads are which.
- Finally, click, “Create Audience” and within a few minutes the ad will be live.
Now rinse and repeat this process for each of the time sets mentioned above.
The last piece to this puzzle is actually creating the ad content aka ‘creatives’.
Create Your Ad Content With Canva
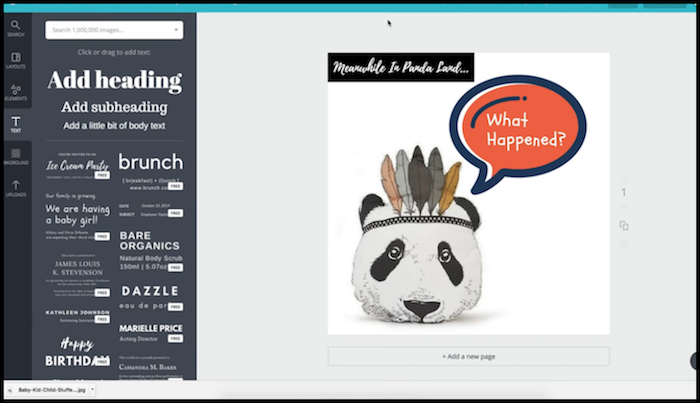
Jump over to Canva, login and click “Create a Design” from the top left corner. It’s FREE to use.
Click “Use Customer Dimensions” from the top right of the following page.
Change the size to either 1200×1200 or 800×800 as these are the sizes that work for FB advertising.
Now for each product you’re promoting with each ad set, you’ll want to copy the main product image from the product page and upload it to Canva by clicking “Upload.”
And customize the rest of the ad creative according to your own brand. Refer to the video above for additional inspiration.
Download your design, and upload it to Facebook Text Overlay to make sure the image text will be approved prior to creating our actual ad.
If you need a refresher on the process of Facebook Ads creation, check out Day 9…
That’s it for Day 23 – Well done!
Questions, comments or just want to say hi? We love hearing from you below.
Success by choice, not by chance,
-David Aston
P.S.
If you’re not kept in the loop via our #Bizathon list be sure to sign up today.
P.P.S. Click here for Day 24!